Personal path to star tracking
... with reviews of Omegon MiniTrack LX4 Quattro NS and Vixen Polarie U
Warning: This is work in progress. The review is personal. As with any device where precision has an impact on outcome there could be a copy to copy variation so what I measured here might not be representative of other units.
Why tracker?
Before I bought my first star tracker, I already had some experience with untracked night sky photography. For example with landscapes here (all with Sony A7Riv with 20/1.8G): Bezděz Castle with stars, Berounka river with Milky Way or the three at the end of this album. I also tried Andromeda with Sigma 135/1.8 and many stacked 2s exposures. My first Milky Way with landscape dates back to 2014 (Nikon D610 and 18-35mm/3.5-4.5). So all that time I did not use a tracker, but I stacked (mostly in Sequator or DSS). I also had quite a bit of experience with the Moon with landscape photography.
So I wondered for quite some time if a tracker would be able to improve my night sky with landscape photography and possibly expand my hobby into the area of deep space astrophotography.
Commonly stated theory is that I can get a better night sky with longer tracked exposures over shorter exposures stacked. I think that this is true for long focal lengths, but is it true for shorter lengths used in landscape astrophotography when using modern sensors? That is a theory I want to test.
My decision process to select the first star tracker
There are many competing concerns. One of them even before choosing any tracking mount is the divide between landscape with night sky (also called nightscapes or landscape astrophotography) and pure astrophotography where landscape is not present. Desirable attributes of solution for landscapes: low weight, low volume when in bag, easy to set up in dark, works well with lenses up to about 50mm. While for pure astrophotography the weight is not as important as it can be shot from any dark place which still might be close to car parking. It can be shot even from a balcony in a somewhat light polluted city (with some limitations and longer exposure total times to capture what could be captured faster in low light pollution areas). On the other hand the precision of tracking becomes the most important thing as the focal lengths increase. In this sense any device desired for both nightscapes and deep astrophotography is already a compromise.
So I decided to start with a rather portable solution to support my nightscape needs. But I hoped to use it with my Sigma 135mm/1.8 occasionally for pure astrophotography, possibly even longer focal lengths with my Tamron 50-400/4.5-6.3.
I researched common tracking mounts used by nightscape photographers. I noticed several categories of products. Some are super lightweight, but only usable with wide angle lenses. Some of them are controlled through mobile phone wifi which is not for me (it is cold on most nights here so fiddling with my phone and losing night adapted vision is not something I would prefer to do). Some others are not so lightweight, but they increase possible focal lengths. I have noticed this page by Roger N. Clark on astrophotography tracking mounts. It describes the concept of periodic error which is a measure of deviations from appropriate sidereal tracking rate (representing Earth rotation around its axis and a minor adjustment to it because of Earth rotation around the Sun relative to stars). It shows that for example Omegon MiniTrack LX3 has 60-90 arc-seconds periodic error in 10 minutes and 32 arc-seconds periodic error in 27s (worst slope in 10 minute sample). What surprised me more was that even quite bigger tracking mounts can have a high periodic error. For example the page shows 50-80 arc-seconds for Star Adventurer Gti that weighs 2.6kg and still may require counterweight for unbalanced payload. Now the SA Gti can use autoguiding to correct the periodic error and achieve much better performance, but that requires a much more complicated setup which is not something I would like to use in a dark location (it is fine for backyard astrophotography, but that is not my use case). I have also noticed the Fornax Mounts Lightrack II that has low periodic error (2 arc-seconds in 8 minutes) without guiding. The main tracking unit is reasonably priced and weights just 1.3kg. That has captured my attention for a while, but necessary matching wedge and Polar scope add to the price and weight quite a lot.
At some point of my research I have reached a personal website dedicated to astrophotography (in German language, author name is Adam) that has a very extensive review of LX3 and a smaller one of LX4. These reviews have convinced me that LX4 will be capable enough for my use. So ordered LX4 with Polar scope and low-height OM10 ballhead. If I wanted something more for deep astrophotography, I could buy something better later. Yet I noticed somewhere at DPReview forums that a user wrote that cheap options are called hobby-killers in his astro club. They perform so badly that they kill the interest or confidence of aspiring astrophotographers. So I wondered what kind of performance I could get from LX4. Will it be a good performer? Will it be a hobby-killer? Will it be a gateway drug to ever increasing expenditures on deep space astrophotography?
Tests of my Omegon MiniTrack LX4
My first unit of LX4 has had a bad cut in one of the teeth on the moving plate. I have exchanged it with a new one which is fine in this regard (I can recommend dalekohledy-mikroskopy.cz which responded fast to my replacement request and arranged exchange unit for unit at Elty shop). Otherwise build quality appears solid. Build of the body is very sturdy. There is nothing overly wiggly in the load bearing parts. The windup clock ringing is as loud as I feared (I would prefer to have the ability to make it more silent, I am aware that there is video that shows such modification for the older LX version).
I had to wait some time for the clear night skies. Only thing I noticed while having cloudy nights was that the timer ticking is somewhat sensitive to rotation in a sense that I can hear frequency changes while rotating the unit in my hand.
My first tests have shown that the tracker works well enough for 30s at 20mm focal length. But with 135mm I was getting uneven performance. At some point I was running an intervalometer set to repeated 30s exposures with that 135mm and I was getting alternating results where one image was perfect (or almost perfect) and the other was showing significantly stretched stars with trails 5 to 10 pixels long. Some of that could be a Polar axis alignment issue or an inappropriate BPM correction (Omegon has a spring to adjust BPM, I left that at 0 as my load was mostly centered). So that has got me interested in measuring what periodic error I am getting.
The way to measure periodic error is described in Roger's page linked above. It is very easy to measure it. Just do Polar alignment and rotate the mount roughly 10 degrees east or west (using a tripod rotation ring). Point camera with longer lens to meridian at 90° from Polar axis (in my case: 50° N latitude, in January near midnight, there is Orion close to that). The stars then move up or down almost perpendicular to the axis in which tracking happens so all the errors in tracking get graphed in star trails. To compute periodic error in arc-seconds (to have a number comparable with other mounts, otherwise length of pixel trails is more useful information), you will need to know an angle captured by a pixel on camera for focal length of used lens. In my case I have 6336 pixels per picture height (60MP full frame sensor; it has pixel density just like 26MP APS-C but bigger area) and 135mm lens. Using the field of view calculator there is 10.16° per picture height so 10.16°/6336=0.001603° per pixel or more conveniently 5.77" (arc-seconds). So ten pixel trails (or 10 pixel deviation from straight line connecting start and end of exposure in periodic error graph) correspond to 57 arc-seconds error which is within the range reported for LX3 in the Roger's page (though that is for 10 minutes, not for 30s). That made me realize that for my high resolution sensor I might need a better tracker even for relatively short focal lengths. Most of the examples in Adam's review in German were with Canon 6d with a full frame 20MP sensor (that would need 1.73 times higher focal length to capture the same angle per pixel compared to my 60MP).
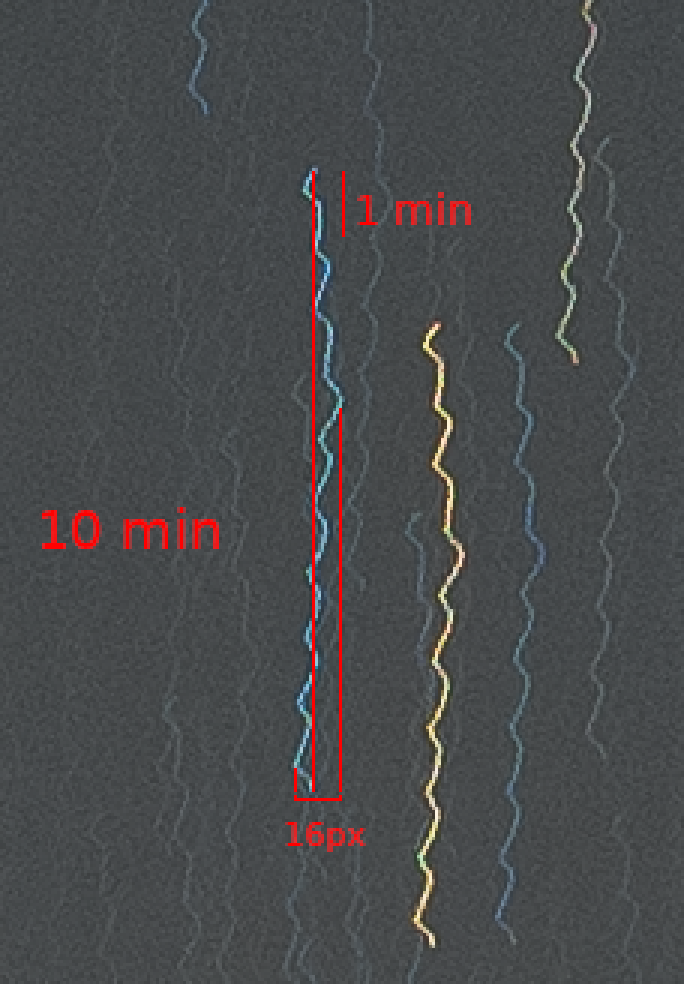
So in two separate nights I captured these two periodic error plots. Both show comparable values so I assume they are correct. The first night I took this one and annotated it. Pixels in the image 3 times enlarged. The plot is rotated so that line connecting start and end is horizontal:
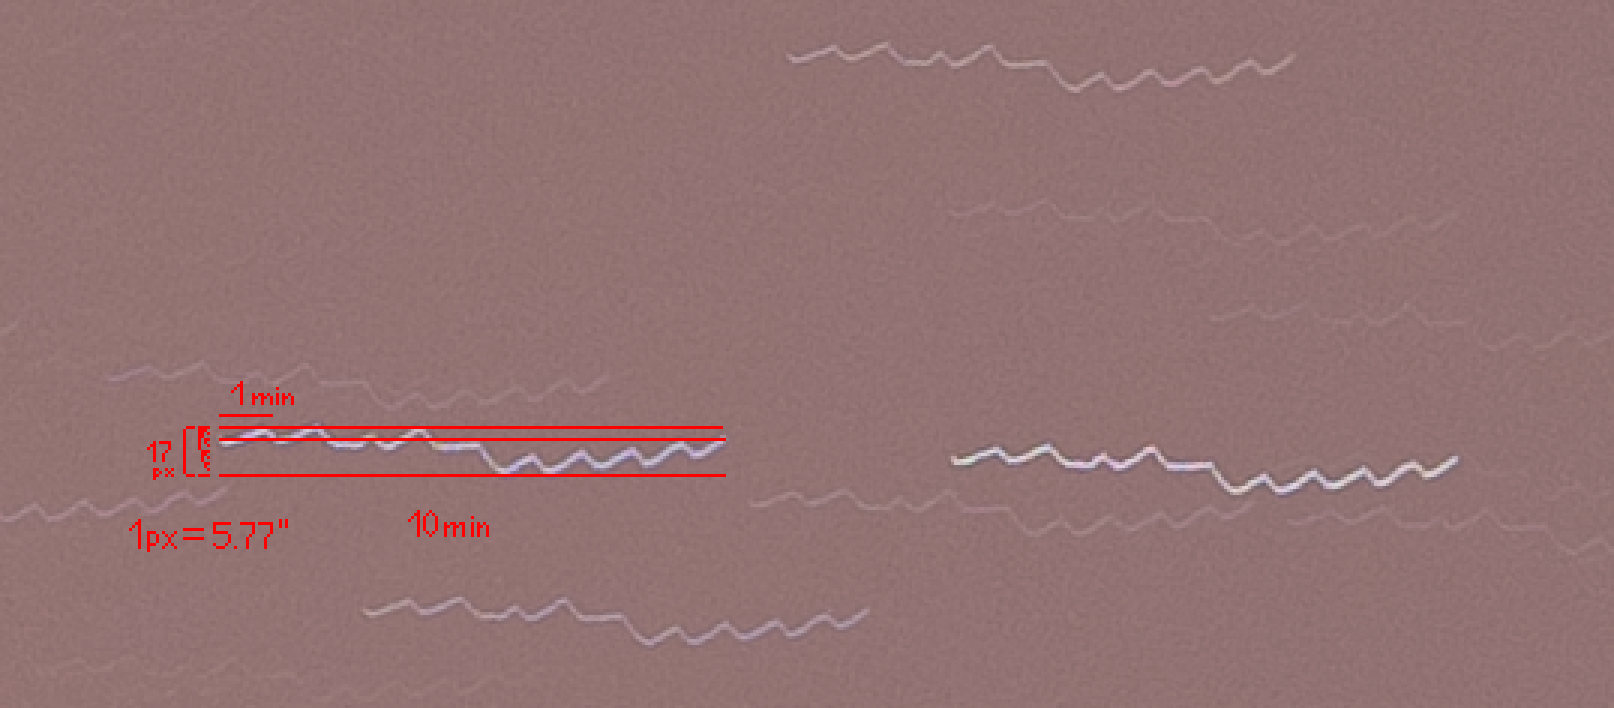
So during 10 minutes the PE is about 17 pixels which amounts to 98 arc-seconds error. A bit higher than what Roger reported. More concerning is about 7 pixel (40 arc-seconds) PE during many 1 minute intervals. I also have a separate exposure of 90s (just after this image) for which I also recorded a video with my phone so I had a soundtrack with Omegon ticks to analyze BPM and its changes during exposure. The 90s exposure showed a wave like any other 90s exposure above and I wondered if the wave corresponded to changes in BPM or if it was just gear imperfections. I analyzed audio with my program that exactly identified ticks and tocks and concluded that slopes in the graph would require much bigger BPM changes than what I was observing (on average 133.3 with only small differences).
The other night I captured another periodic error plot. This time using three longer exposures spanning almost the whole arm movement range. This time I did not enlarge pixels (it is more to show general pattern and longer exposures make it long already) and I did not rotate the image. It is just cropped and has three exposures overlaid plus my annotations. I did connect only the starts and ends of each exposure as I did touch the camera between exposures and I might have shifted it a tiny bit.
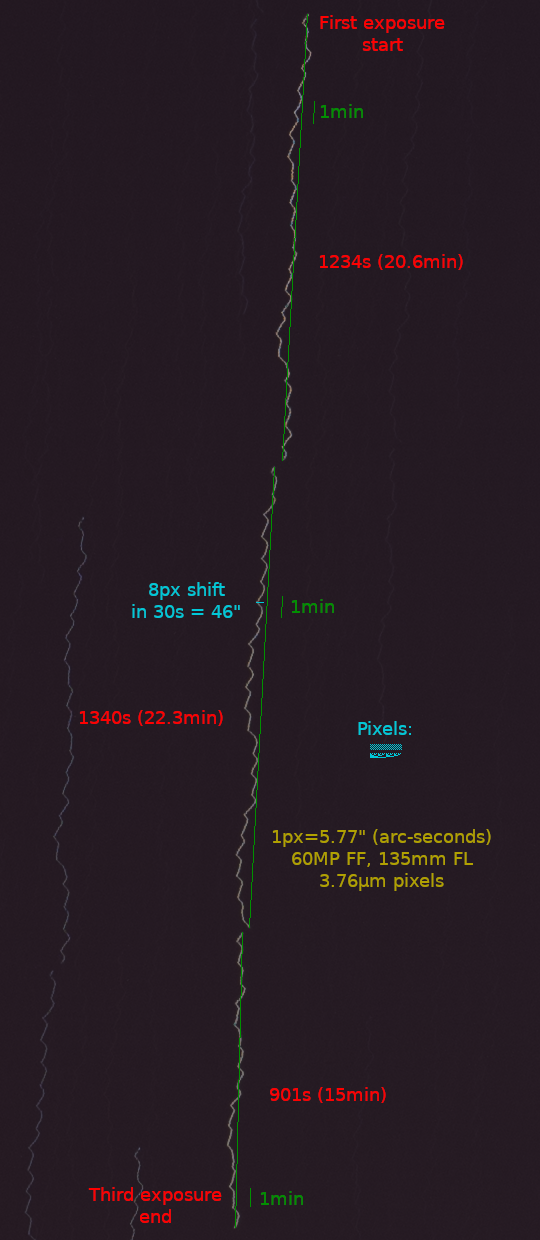
So this is in line with what was already visible in the 10 minute PE plot. Is it bad? So let's say you get 8px trails in half a minute at 135mm (see the cyan label on the left side and small line next to it which shows 8 pixels). That means you will get 1.2 pixels trail at 20mm which is perfectly ok; 1.4 pixels at 24mm, still ok; 2 pixels at 35mm. But not ok at 50mm where the trail will be 3 pixels. Now if you downscale from 60MP to 15MP, those 3 pixels become 1.5 so at lower resolutions it is still ok, but you can definitely see you are not getting all the performance the sensor is capable of.
Even at 30s, slightly below 50% of pictures were good enough at 135mm. How is that even possible with that triangular PE shape? Perhaps the trail was there but the part outside of average deviation was only a short time compared to the rest of the exposure (I see astrophotographers measure PE using RMS to account for that). Or it could be that a timer inaccuracy or alignment made it that one of the sides of triangles was almost perfect correction for star movement while the other was abrupt change (like a small creature going over stairs, it is mostly going over a flat surface, except for step edges). That could explain alternating performance between even and odd pictures (but it is hard to rely on that because exposure might not align well with it).
Here performance alternated (order is left to right then next line) in the bottom half (135mm 60MP crops, 30s, f/2.2, ISO 320, some light pollution, captured sequentially using a7rv's built-in intervalometer):
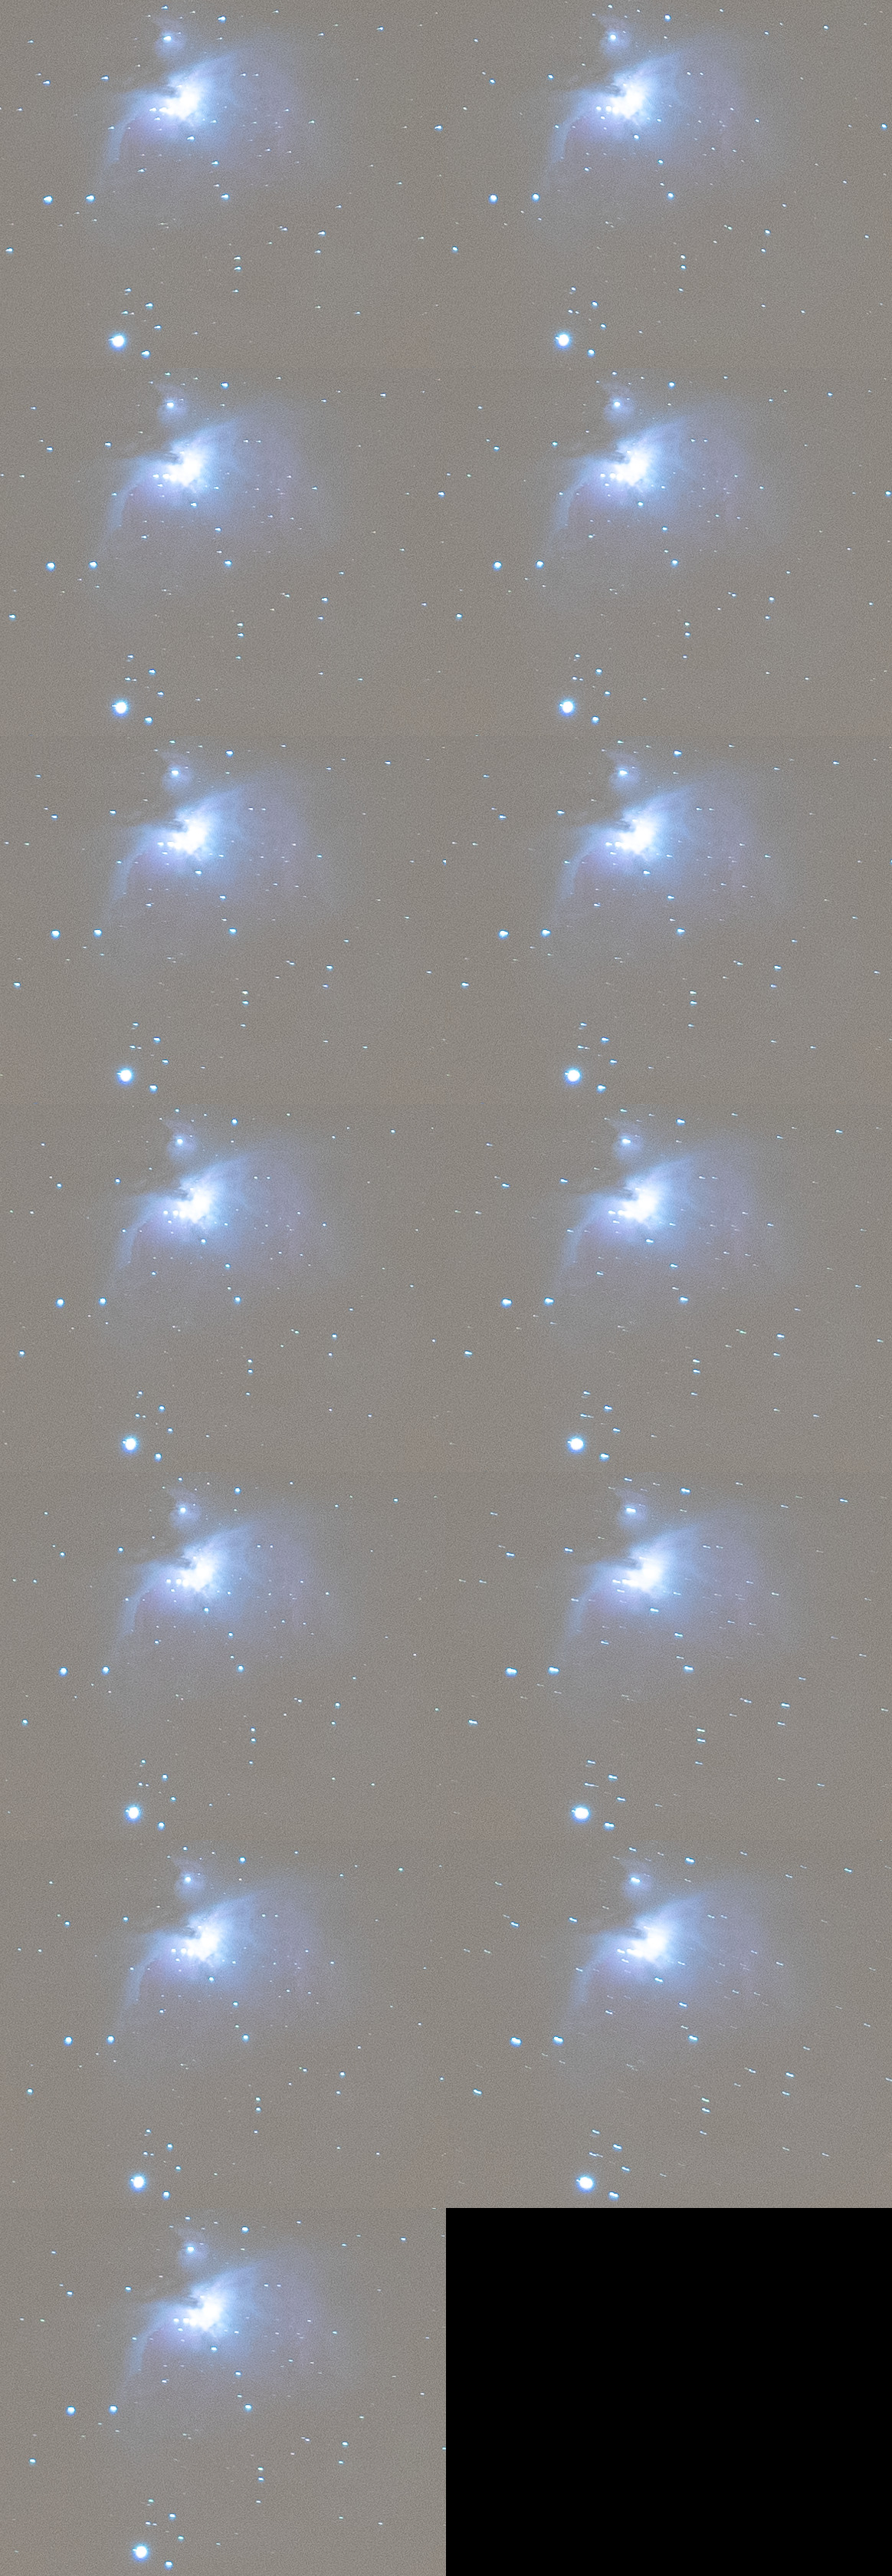
In this case the performance was varying. Slightly less than a half of images were almost perfect, but other half was quite imperfect (135mm 60MP crops, 30s, f/1.8, ISO 100, some light pollution, captured sequentially using a7rv's built-in intervalometer):
Another way to look at the PE is in terms of tracking speed variation. Normal sidereal rate is 360° per 24 hours plus correction of Earth going around the Sun relative to stars, which is 360° per 365.25 days in a year. So (360+360/365.25)/24 = 15.04106° per hour = 15.04106 arc-seconds per second. That is the desirable speed of tracking for stars. Periodic error means that tracking is slower and faster at times. Reading the pixels, in the 10 minute sample few pages above and considering only short PE period (about 1 minute), there the tracking is about 8 pixels (plate scale 5.77 arc-second per pixel) slower in 40s then it gets compensated in about 20s by being faster (there is some asymmetry to speeds). This corresponds to speeds of tracking 15.04106-8*5.77/40=13.88706 arc-second per second (when slower) and 15.04106+8*5.77/20=17.34906 arc-second per second (when faster). There are two ways to look at it.
The first is: If the variation would be caused by improper ticking BPM (135BPM corresponds to 15.04106 arc-second per second), there would be variation between 125 BPM and 155 BPM throughout the minute. That is not the case. The timer BPM is not perfect (it was ticking at 133 BPM during analyzed 90s of ticking with small variations), but it is not that bad. This is a periodic error where imperfections of small gears cause the periodic behavior.
The second look is: what advantage does this tracker bring (besides all the disadvantages of weight, space taken in bag, time to set up)? Without tracker the stars are moving at rate 15.04106 arc-seconds per second (which means with the 135mm and my 60MP sensor giving 5.77" plate scale that stars at celestial equator would drift about 3 pixels per second and at slower rate far from celestial equator). This limits exposure times. With this tracker, the stars are moving (based on measurement above) at speeds up to 8*5.77/20 = 2.308 arc-seconds per second which is about 6.5x slower. This means that exposures (for this 135mm lens) can be 6.5x longer (for the faster 20s in the period) and similarly 13x longer (for the slower 40s) compared to what I would use without tracking. That is for the 135mm where peaks for this small PE cycle are recorded. For the 20mm, the peaks of this 1 minute-cycle PE will be small enough so this period is not relevant. But for longer focal lengths where peaks are high enough (let's say from 35mm, where 8px*35mm/135mm=2.1px) these relations will apply. So is it worth it? Is there an advantage to longer exposures that multiple shorter exposures do not have? I wanted to know and I have found the best analysis of it here in sharpcap forums. That is the theory. It tells me that for sensors with high read-noise the advantage is significant, but for sensors with low read-noise the advantage is less significant. My a7rv has relatively low read-noise so it might be a very interesting comparison to compare many short exposures and few longer exposures with a tracker of the same total exposure time. Perhaps with some longer total time for untracked use as setting up a tracker and aligning takes some time. That is the experiment I will try to do. Of course with a better tracker (possibly with guiding), I could get 100-1000x longer exposures instead of 10x, but it will likely weigh more and have even longer setup time.
Somebody mentioned in a FB group that it might be useful to let minitrack run for some time for the gears to mesh together. That is an interesting theory to test so I let the minitrack run empty for 22 full cycles and re-measured 10 minute PE. Pixels here are 3x enlarged in the image:
It is not worse, but it is not significantly better either. 16*5.77=92 arc-seconds error over 10 minutes. Highest slopes are about 5 pixels in 15s (29 arc-seconds in 15s).
Few weeks later (a lot of cloudy nights in between) I have shot an Orion region from my apartment balcony with LX4 and A7rv+Sigma 135. I wanted to have better chance of success so I shot only 15s subexposures. I did not have perfect polar alignment as I do not have Polaris visible. But with such short exposures precision is not needed. I also shot few shorter exposures to have exposure data for brighter stars. I have taken 346 15s exposures before clouds impacted the sky. Of these 177 (51%) were acceptable (perfect or slightly imperfect in my manual selection, but still ok for me). The other half could be divided in two quarters, the first that someone might still accept and the other quarter that would be too bad for anybody. So taking only the good ones (about 44 minutes integration) I tried to process them. I tried both Sequator and DSS for stacking. I have subtracted background using several methods in Gimp and Ps, stretched, then cropped imperfect borders and framed it with 1:1 aspect. The results were kind of disappointing given it was the 44 minutes, but it is from a balcony in a city and air quality was not great. Also, I am sure my post processing skills can be improved.

The full resolution picture is here.
The Sigma 135/1.8 Art is great for daytime, but on the bright stars it shows some cyan chromatic aberration and their shapes are not great and they are kind of bloated. Small stars are not perfect either, but it is less visible on them.
Landscape astrophotography with Omegon MiniTrack LX4
Wide lens 20mm
Now it is time for a pretty picture. Here it is:
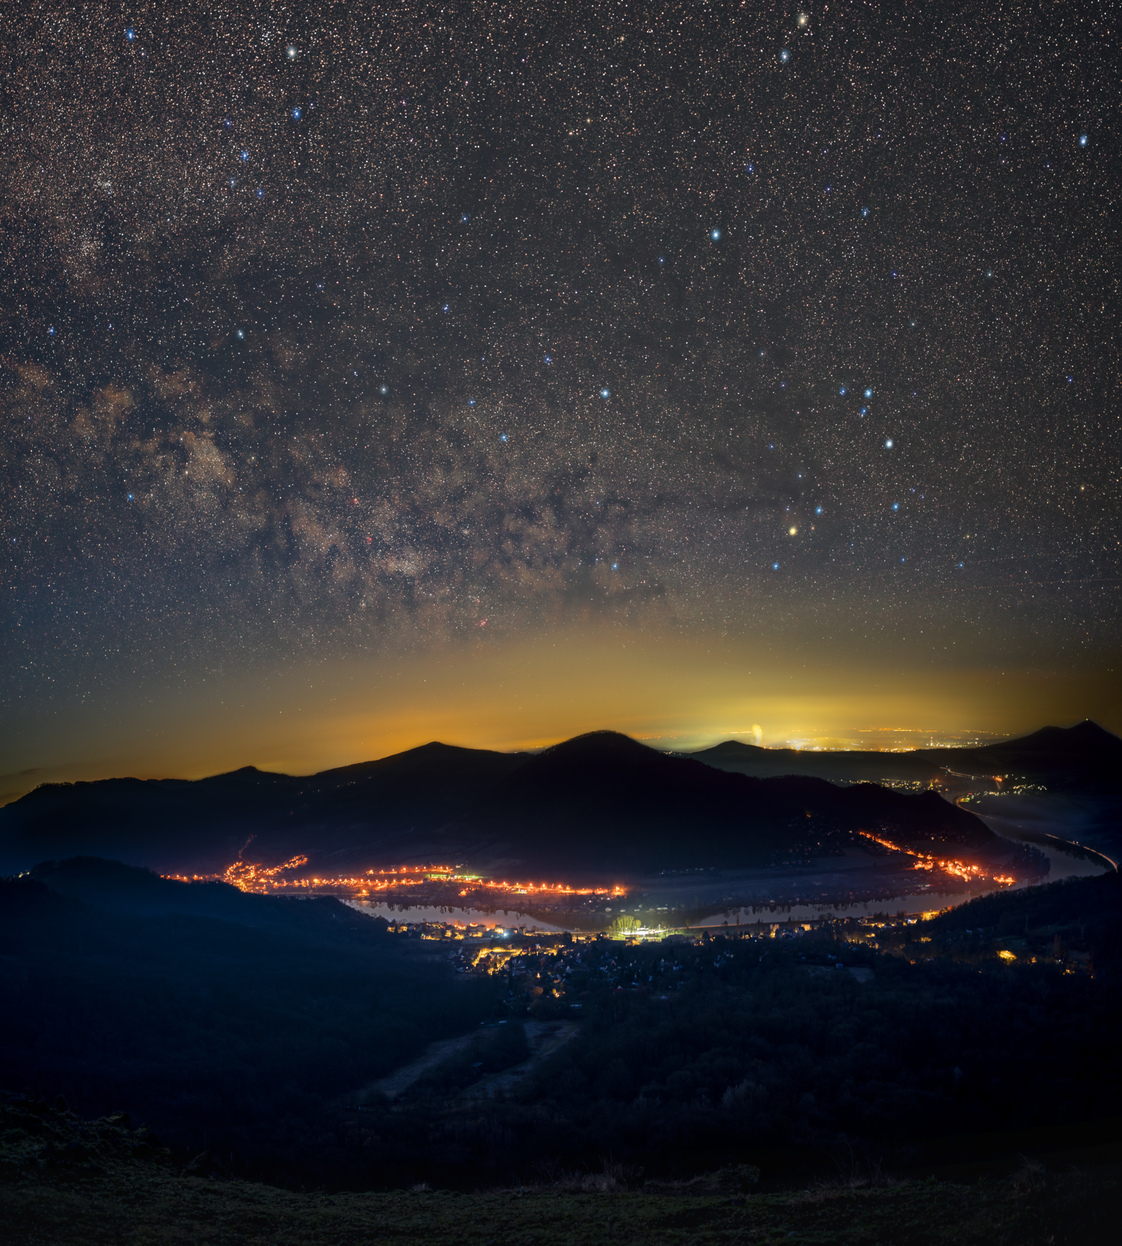
This is my first non-test picture with the tracker. I took it on the 18th Feb 2024. The core of the Milky way was already visible for a brief time before sunrise in the morning. I have used a 20mm lens with 30s exposures which is a combination where periodic error measured above is not relevant. I wanted to use 60s, but A7RV's timed bulb mode which can do 60s is not compatible with internal intervalometer so I have used 30s. This is a better value than the 8s I have used in the past in similar landscape Milky Way pictures. I started before sunrise to take the sky portion of the scene, then I turned MiniTrack off (by unwinding and recomposing back) when the sky was getting too bright and took the foreground. Both exposures were from the same tripod position just pointing up first then down later with overlap on the horizon. I have used (I captured more, but used this) 52x raws (Sony A7RV, Sony 20/1.8G). Sky portion: 7x ISO 100, 30s (of that one defocused for starglow effect); f/1.8 and 39x ISO 320, 30s, f/1.8. Land portion: 6x ISO 100, 30s, f/1.8. I have processed it in LrC, Sequator, Ps, PtGui Standard, Gimp and then back in LrC. The sky position relative to the ground corresponds to the raw file from 5:44 AM.
Picture in higher 4k UHD resolution in my gallery along with non-astro landscape pictures from that morning.
Overall experience with MiniTrack LX4 was positive on this trip. Aligning the Polar axis was not very pleasant on the ballhead. I should have bought a proper wedge, but I hesitated to buy a MiniTrack set with an Omegon wedge as I felt the one from Omegon was quite heavy at 0.7kg. But many high quality wedges are even heavier. I will need to buy some solution with micro-adjustments that will work together with my ballhead or a replacement for both (geared ballhead maybe?) as I will often want to do both astro and non-astro photography on the same trip. But I aligned it well enough. On the 60MP sensor the stars moved 11 pixels (7 arc-minutes) in between first and last sky exposure (about 25 minutes). Stacking almost aligned exposures was easier than what I was used to before using the tracker. Update: I have got Koolehaoda LP-64 leveling base (about €40, it is available under many brand names, just search for "lp-64 leveling base") to use in combination with ballhead. It weighs 200g and allows more precise adjustment of angles than ballhead alone. In daylight testing it worked well. Here is a daylight photo of the setup without camera:
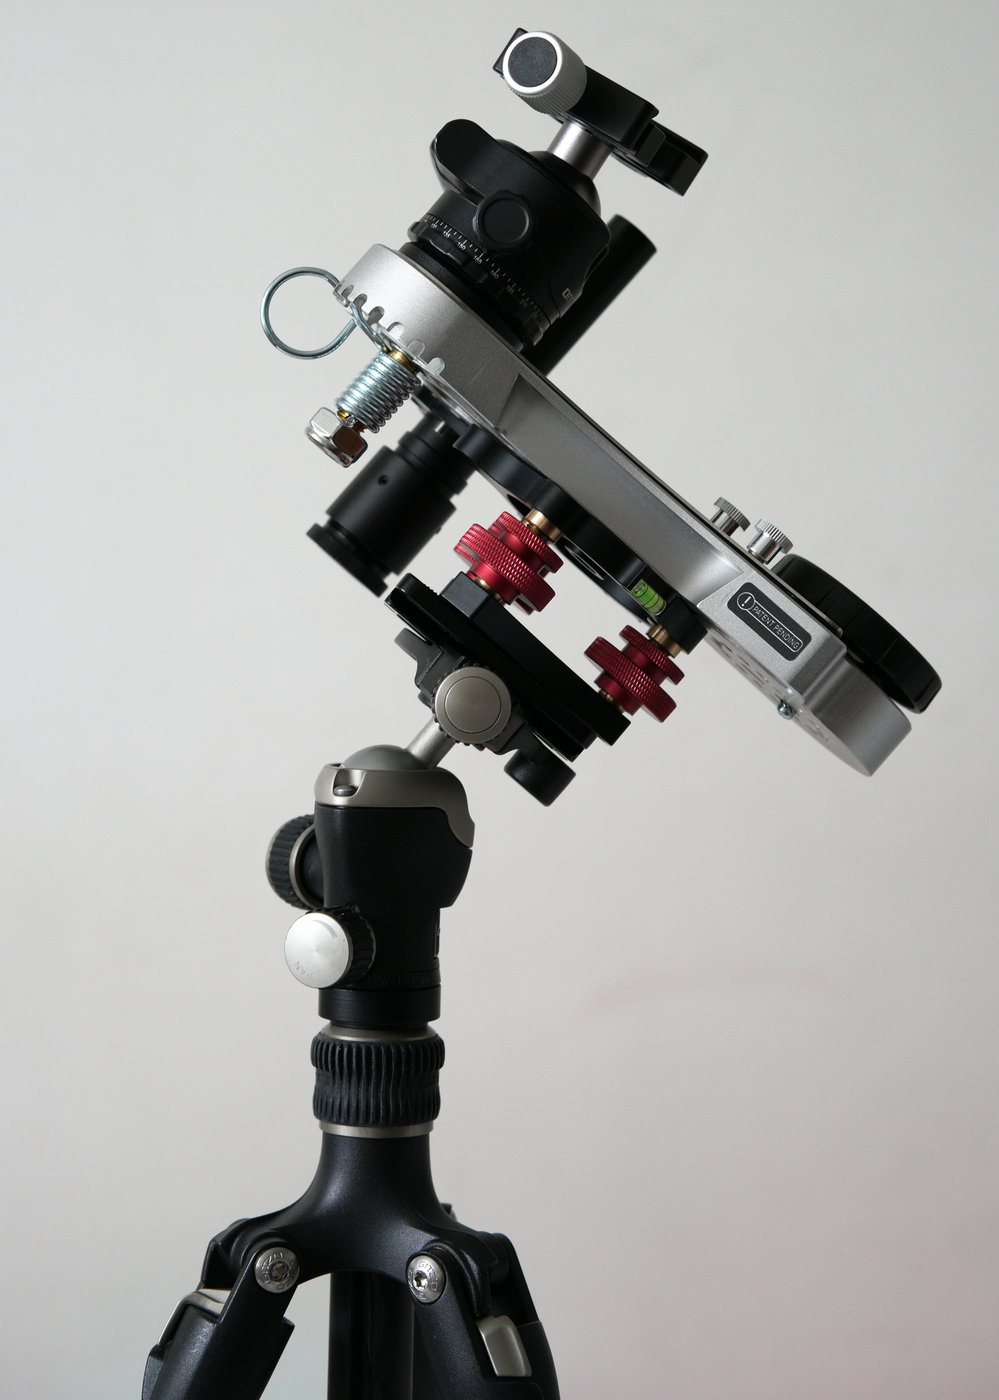
The picture shows Omegon MiniTrack LX4 with OM10 ballhead and scope on LP-64 on Gitzo GH1382TQD ballhead on Gitzo GK100T tripod
Telephoto landscape astrophotography with 135mm
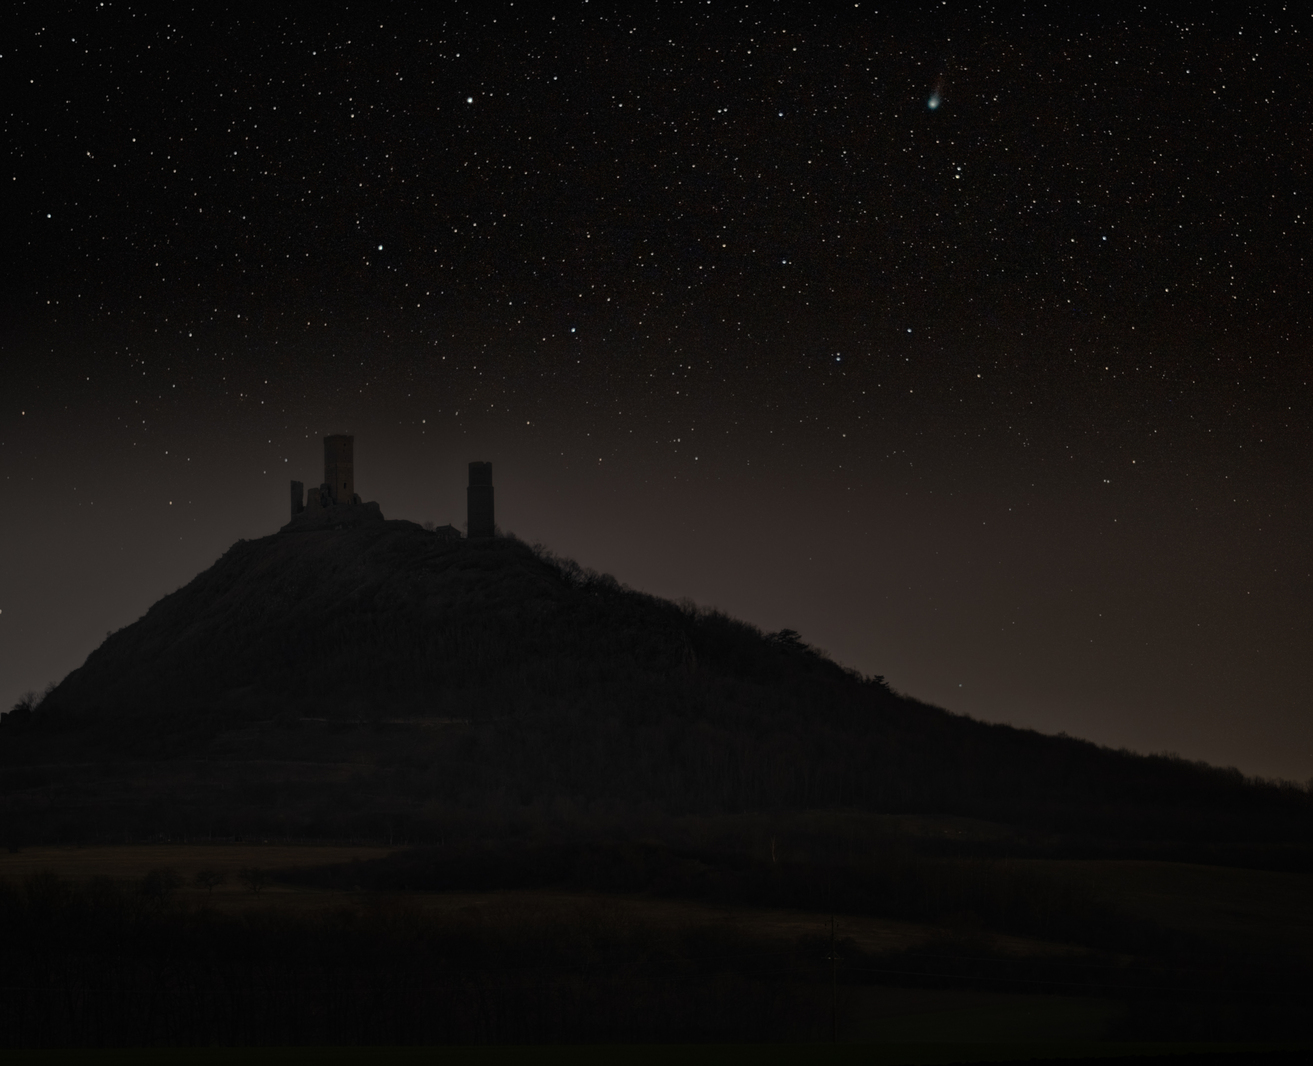
Here I wanted to take a picture of 12P/Pons–Brooks comet with some interesting foreground. The foreground here is Hazmburk castle, it is about 2.2km from the camera, taken with Sigma 135mm lens and cropped somewhat.
The biggest obstacle for a good picture here was the weather. The sky was clear above me, but near the ground there was some mist or haze reducing visibility and increasing the impact of light pollution. So even long total exposure did not make the faint comet tail visible after background subtraction.
I have used LP-64 for fine movements for the polar alignment and it did work well. I wanted to take a vertical panorama to fit the Andromeda Galaxy. But in the end I did not use all the three sky frames. The middle one had less data than the others (some high clouds reduced star visibility) and PtGui did not want to merge two upper layers with the lower one.
So how did the tracker fare here? For the bottom sky layer that was used in the above picture, I selected 52 of 72 exposures (15 seconds, 135mm at f/1.8, FF 60MP A7RV, ISO 640). So 28% exposures were thrown out due to trailing stars. For the middle layer it was 36 of 46 for trailing which is better (22% thrown out due to trailing, but only 11 of 36 were free of thin clouds). For the top layer it was 97 of 134 (28% thrown out).
Here is the picture in the gallery with up to 4k UHD resolution.
Conclusion of the tests and use of my Omegon MiniTrack LX4
This tracker is relatively lightweight and cheap. Operation without batteries has some advantages. It may be beneficial on multi-day trips where charging an extra device is a hassle. It also reduces the chance that you travel to a dark site only to learn batteries are discharged or left at home. Ringing at the end of arm travel is annoying though. It performs perfectly on 20mm 60MP full frame with 30s exposures (probably longer would be possible with this wide focal lengths, but I did not try them as A7RV internal intervalometer does not work with timed bulb mode and I felt 30s is enough to avoid hasle of timing it manually through bluetooth remote). With lower resolution sensors it will work as perfectly with longer lengths (e.g. it equals 28mm on 30MP, or 31mm on 24MP, or 36mm on 18MP). Based on my tests with 135mm, it still would be quite usable though not perfect for 35mm focal length on the 60MP (e.g. it equals 50mm on 30MP, or 55mm on 24MP, or 64mm on 18MP). I did most of my testing at celestial equator which is the hardest for tracking, so for a sky close to poles the tracking errors will be smaller. At 135mm with 60MP sensor the tracking errors were quite frequent even with short exposures like 15s. That prompted me to search for a better tracker. But if you do not need such focal lengths or that high resolution the Omegon MiniTrack LX4 could be an option.
Search for a better star tracker
When I was shooting the comet with the castle at 135mm I realized that even 135mm is a focal length that can be used well for landscape astrophotography (before that I thought I would use 50mm for that purpose at maximum, mostly because of depth of field issues but those were no problem with distant castle). So I wanted to have a tracker that would perform well at that focal length with my 60MP sensor. I have been researching trackers for some time. I have considered two options: adding Fornax Lightrack II to Omegon MiniTrack or replacing Omegon MiniTrack with Vixen Polarie U (both Lightrack and Polarie U cost about the same with accessories). Fornax would have perfect tracking, but its size and weight (with needed accessories) would mean I would only take it for very dedicated astro trips while LX4 size and weight makes it good for general landscape daylight to night time trips. Polarie U weight with accessories is just slightly higher than LX4 with accessories so it can replace LX4. But is it good at 135mm? I have collected reviews of it and there was quite a big spread of unguided performance figures but I have seen no periodic error plot. In the end I decided for the Polarie U.
Tests of my Vixen Polarie U
Periodic error plot of Vixen Polarie U
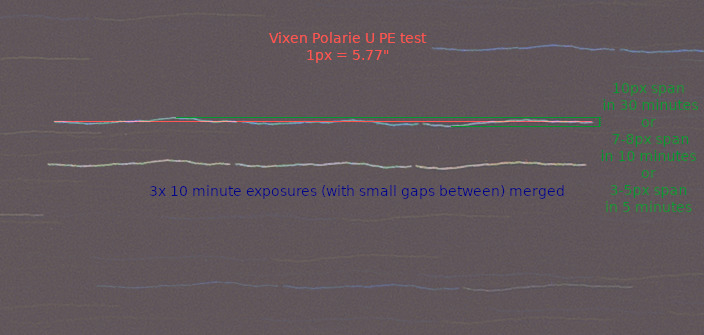
There are three 10 minute exposures merged in layers (blend mode: only brighter), then rotated so that endpoints are horizontal. There is some color difference between the three exposures because of auto whitebalance that I did not correct.
Looks like 1 minute at 135mm 60MP FF will be possible with acceptable star trailing. But to do that I will need to be precise with polar alignment.
Notes on Vixen Polarie U usage
As I noted previously, the one of advantages of the Omegon MiniTrack is that it avoids need to care about battery. I can confirm that it has already happened to me that I had discharged batteries in the Polerie U while on a trip. It was not a true problem, because conditions were not suitable for astrophotography in the end and I also had an extra pack of charged batteries in my bag as a spare. How it did happen? I set the Polarie U in the app to turn off mode lights after inactivity. The light is red and it has adjustable brightness and timeout in the app. I prefer not have such light leaking into foreground of astro-landscapes so I set the timeout. The disadvantage of that is that it is less noticable that it is turned on. So as I was playing with Polarie U in wifi mode trying remote shutter modes, I did forget to turn it off (by moving the switch to off position) which drained batteries over days before the trip.
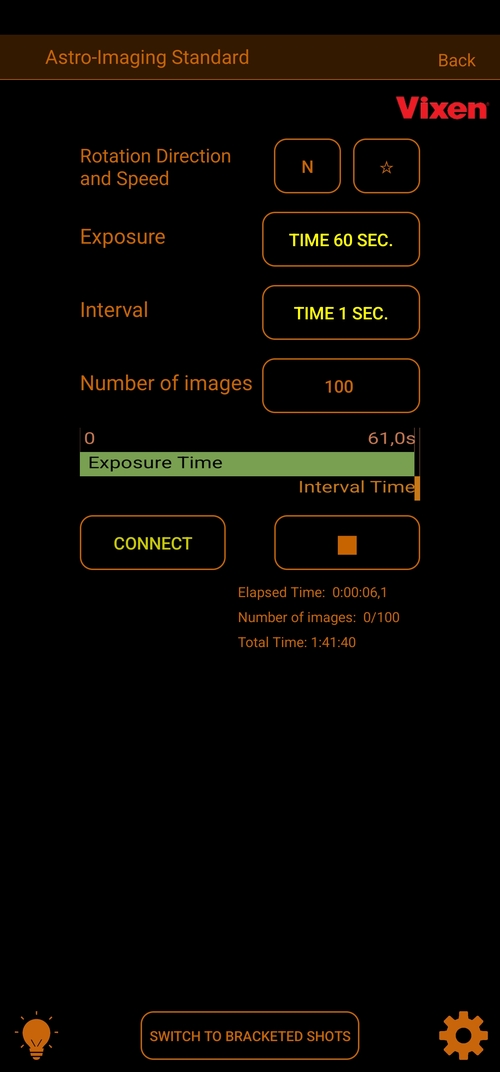
I have seen few Japanese videos and web pages that described the Polarie U app, but those always used screenshots with Japanese language. There are actually two Android apps. The PF-L Assist that helps with Polar scope orientation and the POLARIE U main app for connecting to Polarie U over wifi. Here are two important screenshots from the wifi control app that shows how the Polarie U can drive camera shutter (with appropriate cable that connects to 2.5mm jack connector on the Polarie U and camera specific connector on the camera, in my case the S cable for Sony works with my A7RV by connecting to Multi/Micro USB connector on the camera). The cable is signaling works by connecting ground line to one or the other line which corresponds to holding shutter half or fully pressed. Polarie U manual describes contacts on the jack connector so that makes it possible to DIY the cable.
Standard shots mode:
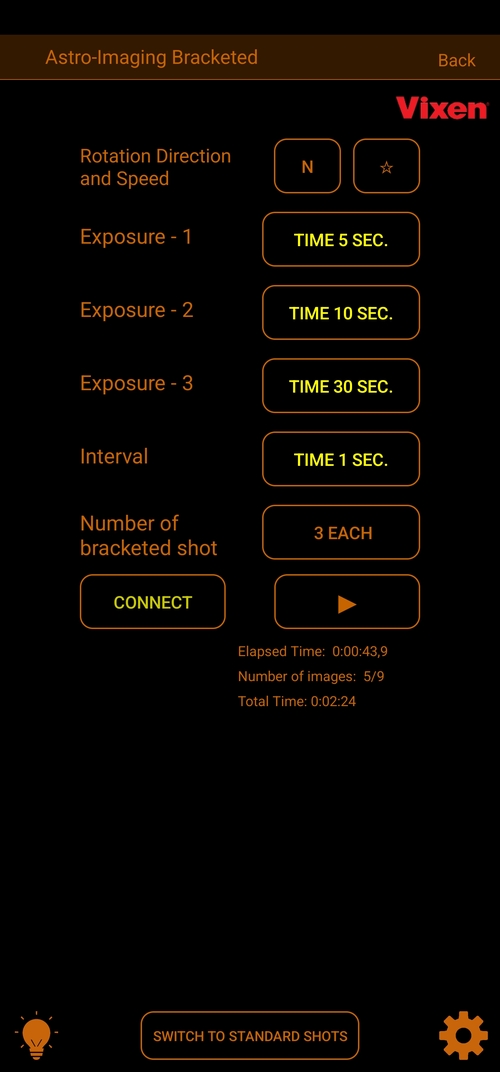
Bracketed shots mode:
The app appearance is customizable. I customized it for dark environment.
The exposure time control is effectively through holding the shutter. So you will need to be in manual mode with BULB timer for it to work. The bracketed shots mode will do all the exposures defined for first exposure time, then the second, then the third. So in screenshot above the 3 of each means order: 3 times 5 seconds, then 3 times 10 seconds, then 3 times 30 seconds. That is a difference over usual in-camera brackting modes that do the different exposure times close together even when used in sequence through intervalometer. The time selector allows user to select between 1 and 999 seconds. Once the exposures are started, you can disconnect phone from the Polarie U wifi and it will continue to work.
Landscape astrophotography with Vixen Polarie U
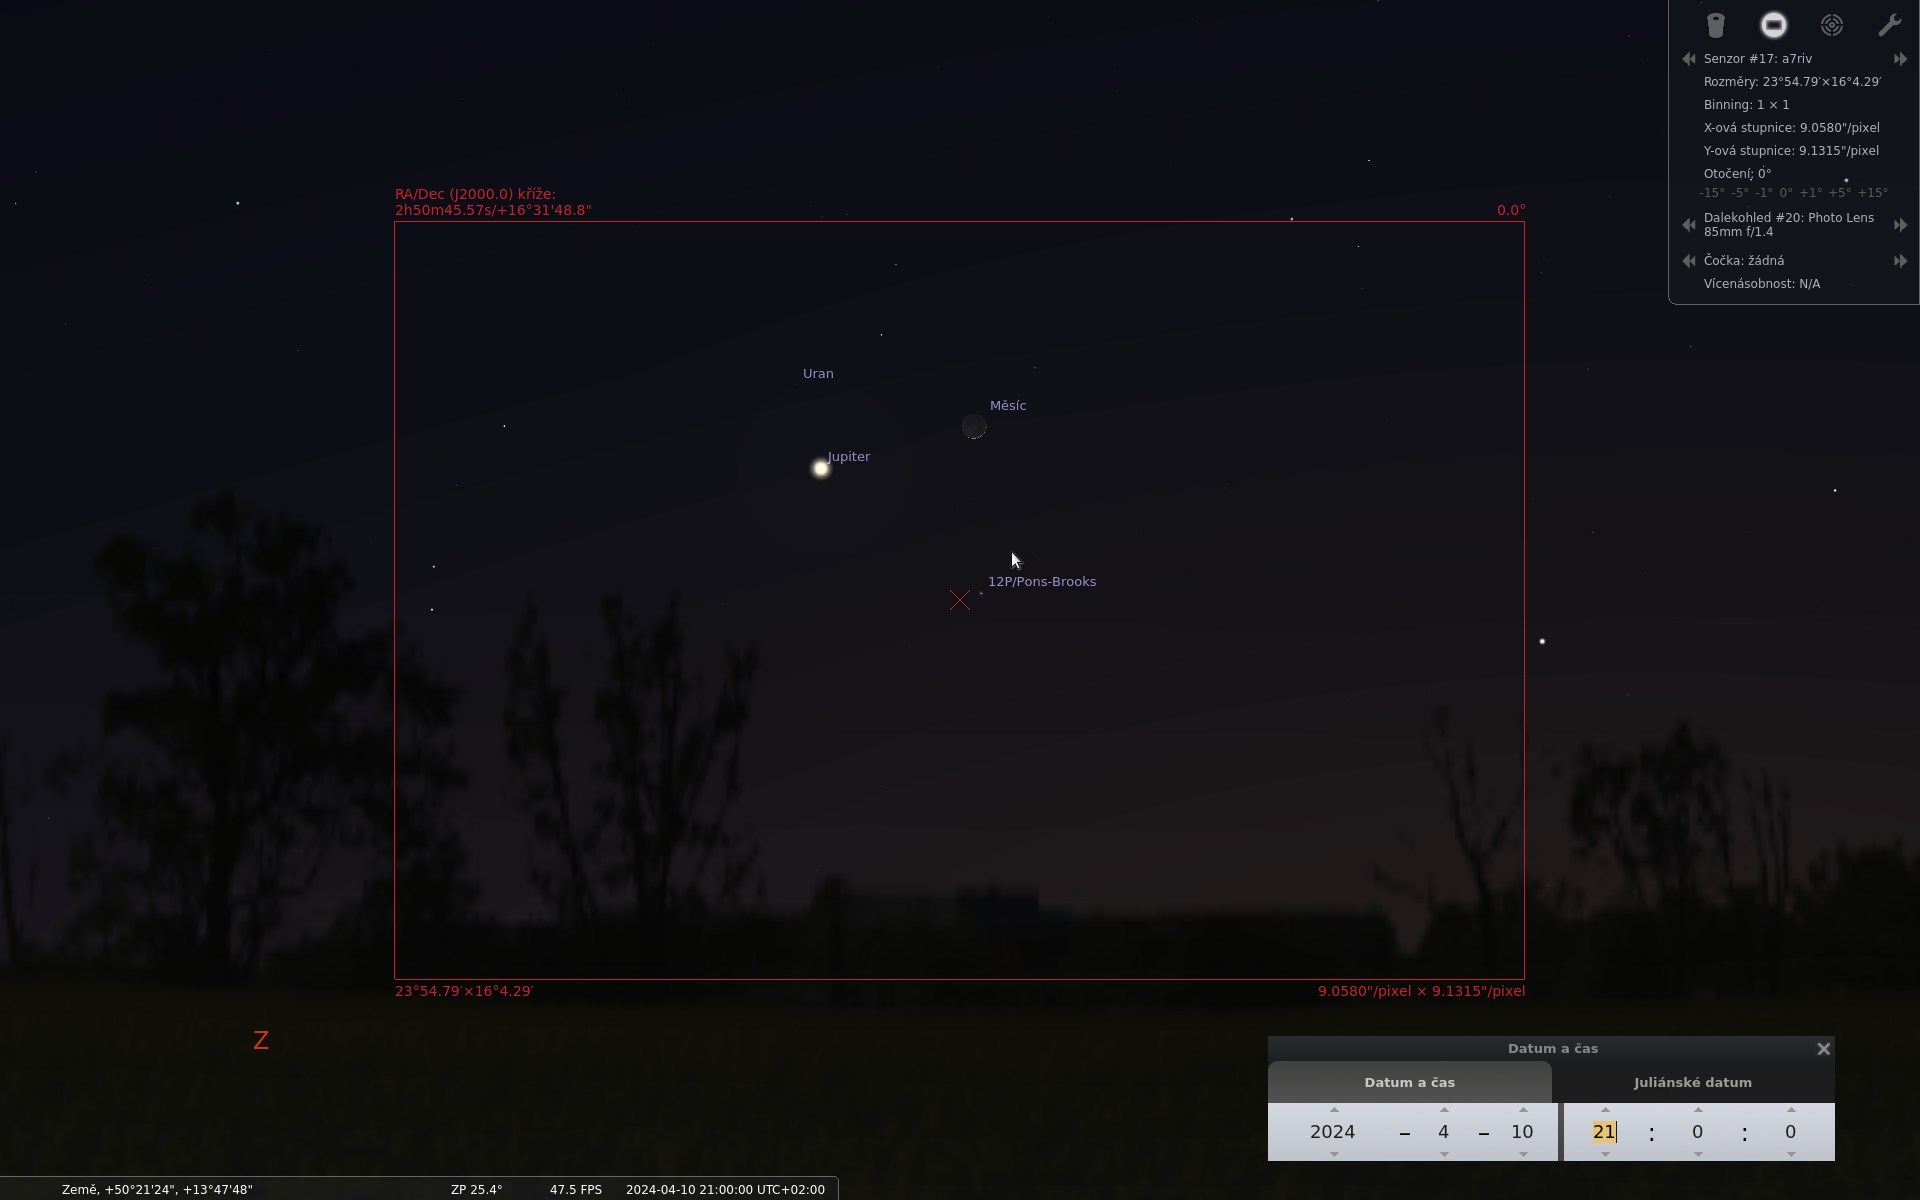
I have been finally able to do some landscape astrophotography after a few weeks of owning the Polarie U and doing only tests from balcony (where I cannot align on Polaris). This was a rare night sky occurence I noticed a few weeks earlier while browsing future sky positions of 12P/Pons/Brooks comet in Stellarium. For the evening of 10th April 2024 the night sky showed a conjunction of the crescent Moon, the comet, Jupiter and Uranus in Stellarium as follows (the red rectangle shows 85mm FF view):
At first I had a different location in mind, but weather prediction was not ideal there so I replanned for Bezděz castle where the weather turned out to be pretty good. There were some clouds, but they mostly dissipated as the night started.
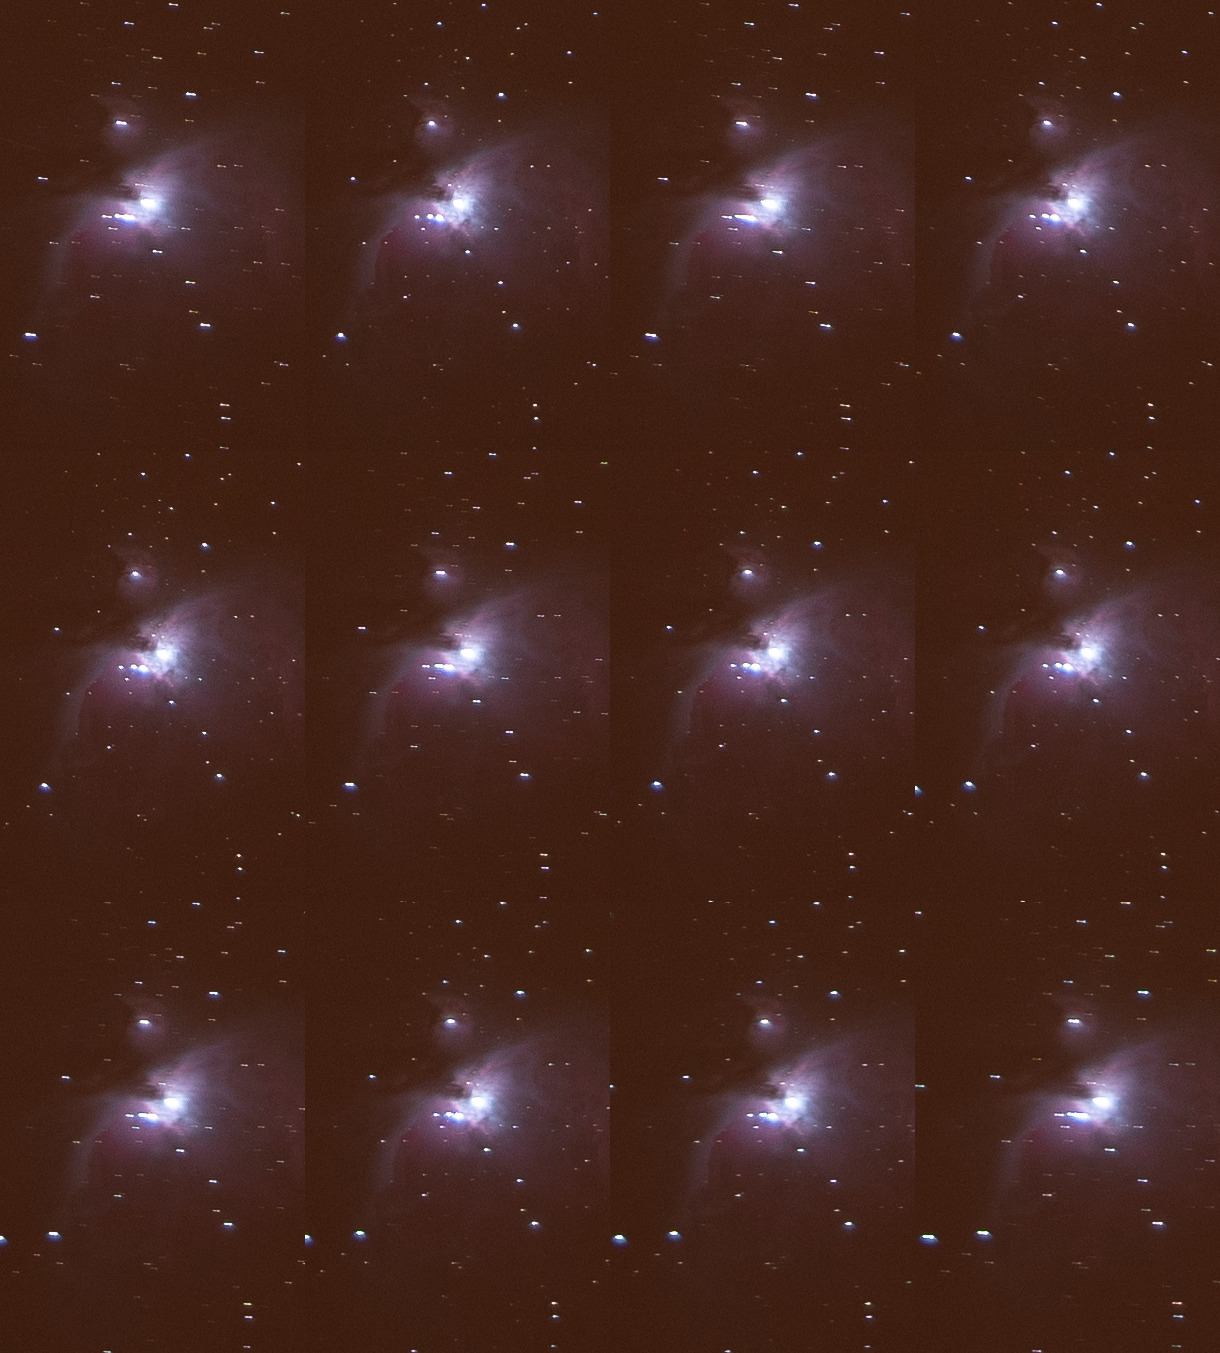
At the location at first I made a blunder when I rushed to do polar alignment when stars were only barely visible. I assumed the brightest star that I could see in rough Polaris direction would be Polaris, but it turned out to be Kochab. I noticed that when I put on the 135mm and did a test shot which showed trailing so I realigned. Then the performance of tracking was perfect for the 60MP FF at 135mm. No trails in any picture.
First, this is the tracked picture alone without any processing. Exposure: 30s, ISO 320, f/1.8. It is the last picture I used for stars and comet from about 20 minute of shooting (some exposures were shorter). Preview:

or here is the 4K UHD version of it.
In this last picture the comet was near the edge of Bezděz mountain and it was dimmer than in some of the previous pictures. The crescent part of the Moon was quite blown out and to have it without clipping I had to reduce exposure to 1/50s. But ultimately, it was hard to have dark part of the Moon and bright in the same picture without it looking weird so I have let it be overexposed.
I took some long exposures of the foregroud after the moonset with the tracker turned off with intention to merge it togther. Was it hard to merge it together? It definitely was not easy. Even the sky part was hard mostly because the Moon moves at different speed than stars which is not a problem at this focal length and resolution for 30s exposure, but for combined stacked exposure spanning 20 minutes the movement was significant and I had to merge Moon just from single exposure. For the stacking, I have use Sequator in a mode that produces aligned pictures and hand merged them in GIMP and G'MIC plugin (I did median of layers of groups of three to get rid of planes and a layer of average of the medians). I have also used starnet++ to get star layer for separate star/background processing.
Here is the outcome with merged foreground (the sky position to the foreground corresponds to above picture taken at 21:32 CEST).

Here it is annotated:

For higher resolution and zooming use the gallery. The gallery also has 50mm view at dusk.
I am pretty happy with the result and the Polarie U performed flawlessly for the task.
I hope I will be able to update the article with some more pretty pictures (from either tracker) soon.
If you have any feedback, write me an email at

Back to main page - Jakub Trávník's resources.